In my previous post, Simplify Mobile Application Development Using ColdFusion, I posted a video that showed how easy it is to create mobile application with CFMobile features of ColdFusion Splendor (Server) and ColdFusion Thunder (IDE). In that video I created a simple app called ‘Simple Expense Tracker’. But the code was not optimal, because the main purpose of the video was to show you features of CFMoible. I also mentioned that I will post a better example of the same app.
So In this post I will show you how to create a database application, where user interface code is separated from the data access code. I will also use JQuery for DOM access and Bootstrap for UI.
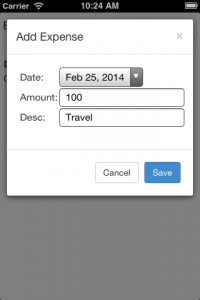
The application is called ‘Expense Tracker’. Here are a couple of screenshots of the application -

This application uses following features of CFMobile. Though tags and code may look familiar to CFML developers, notes that all the features work on the client side and once packaged, CF server does not come into play (because CFML is translated to JavaScript code).
- Easy data access using cfquery/queryExecute
- Client side OOP using cfcomponent
- CFML Custom tags
- Error handling using try-catch
- Interoperability between cfclient code and JavaScript
Let’s see the main page, index.cfm -
1 2 3 4 5 6 7 8 9 10 11 12 13 14 15 16 17 18 19 20 21 22 23 24 25 26 27 28 29 30 31 32 33 34 35 36 37 38 39 40 41 42 43 44 45 46 47 48 49 50 51 52 53 54 55 56 57 58 59 60 61 62 63 64 65 66 67 68 69 70 71 72 73 74 75 76 77 78 79 80 81 82 83 84 85 86 87 88 89 90 91 92 93 94 95 96 97 98 99 100 101 102 103 104 105 106 107 108 109 110 111 112 113 114 115 116 117 118 119 120 121 122 123 124 125 126 127 128 129 130 131 132 133 134 135 136 137 138 139 140 |
<!DOCTYPE html> <html> <head> <meta name="viewport" content="width=device-width, initial-scale=1.0"> <link href="css/bootstrap.min.css" rel="stylesheet" ></link> <script src="js/jquery-2.0.3.min.js" ></script> <script src="js/bootstrap.min.js" ></script> <script src="js/app.js" ></script> </head> <body style="margin-left:5px;margin-right:5px"> <nav class="navbar navbar-default navbar-static-top" role="navigation" style="vertical-align:central"> <h4 style="float:left">Expense Tracker</h4> <button type="button" class="btn btn-default navbar-btn" id="deleteAllBtn" style="float:right">Delete All</button> <button type="button" class="btn btn-default navbar-btn" id="addBtn" style="float:right">Add</button> </nav> <div id="expenseListDiv"> </div> <div class="modal fade" id="addDlg" tabindex="-1" role="dialog" aria-hidden="true"> <div class="modal-dialog"> <div class="modal-content"> <div class="modal-header"> <button type="button" class="close" data-dismiss="modal" aria-hidden="true">×</button> <h4 class="modal-title">Add Expense</h4> </div> <div class="modal-body"> <table width="100%"> <tr> <td>Date:</td> <td><input type="date" id="dateTxt"></td> </tr> <tr> <td>Amount:</td> <td><input type="text" id="amtTxt"></td> </tr> <tr> <td>Desc:</td> <td><input type="text" id="descTxt"></td> </tr> </table> </div> <div class="modal-footer"> <button type="button" class="btn btn-default" data-dismiss="modal">Cancel</button> <button type="button" class="btn btn-primary" id="saveBtn">Save</button> </div> </div> </div><!-- /.modal-dialog --> </div> </body> </html> <cfclient> <cftry> <cfset expMgr = new cfc.ExpenseManager()> <cfset expenses = expMgr.getExpenses()> <cfcatch type="any" name="e"> <cfset alert(e.message)> </cfcatch> </cftry> <cf_expenseList parentDiv="expenseListDiv" expenses=#expenses# action="displayAll"> <cffunction name="displayAddExpenseDlg" > <cfset $("##addDlg").modal() > </cffunction> <cffunction name="saveExpense" > <cfscript> var dateStr = trim($("##dateTxt").val()); var amtStr = trim($("##amtTxt").val()); if (dateStr == "" || amtStr == "") { alert("Date and amount are required"); return; } if (!isNumeric(amtStr)) { alert("Invalid amount"); return; } var amt = Number(amtStr); var tmpDate = new Date(dateStr); var desc = trim($("##descTxt").val()); var expVO = new cfc.ExpenseVO(tmpDate.getTime(),amt,desc); var expAdded = false; try { expMgr.addExpense(expVO); expAdded = true; } catch (any e) { alert("Error : " + e.message); return; } </cfscript> <cfset $("##addDlg").modal("hide") > <cfif expAdded eq true> <cf_expenseList parentDiv="expenseListDiv" expenses=#expVO# action="append"> </cfif> </cffunction> <cffunction name="deleteAll" > <cfscript> if (!confirm("Are you sure you want to delete all?")) return; try { expMgr.deleteAllExpenses(); } catch (any e) { alert("Error : " + e.message); return; } </cfscript> <cf_expenseList parentDiv="expenseListDiv" action="removeAll"> </cffunction> </cfclient> |
From line# 5-7 we include Bootstrap and JQuery files. We also include our application specific JS file (app.js) on line# 9. Then from line# 12-54 we create HTML user interface, which include top navigation bar, div to contain expense list and modal dialog for getting inputs for adding new expense item.
<cfclient> block starts from line# 56 till the end of the file. Note that you could move this content to another cfm file and use cfinclude (in cfclient) in index.cfm to include that content.
On line# 60 we create an instance of ExpenseManager CFC and then call getExpenses method on it. This method returns array of ExpenseVO CFCs. On line# 68, we call a custom tag <cf_expenseList> and pass a few attributes, including id of the div in which to show expense list and array of ExpenseVO objects that we got above. Then we have UI handler functions - displayAddExpenseDlg, saveExpense and deleteAll.
Here is the code in ExpenseManager.cfc -
1 2 3 4 5 6 7 8 9 10 11 12 13 14 15 16 17 18 19 20 21 22 23 24 25 26 27 28 29 30 31 32 33 34 35 36 37 38 39 40 41 42 43 44 45 46 47 48 49 50 51 52 53 54 55 56 57 58 59 60 61 62 63 64 65 66 67 68 69 70 71 72 73 74 75 76 77 78 79 |
component client="true" { this.dsn = "expense_db"; function init() { var dbCreated = localStorage.dbCreated; if (!isDefined("dbCreated")) localStorage.dbCreated = false; if (!dbCreated) { try { createTable(); localStorage.dbCreated = true; } catch (any e) { alert("Error : " + e.message); } } } function createTable() { queryExecute( "create table if not exists expense (id integer primary key, expense_date integer, amount real, desc text)", [], {"datasource":this.dsn}); } function addExpense (expVO) { queryExecute( "insert into expense (expense_date,amount,desc) values(?,?,?)", [expVO.expenseDate,expVO.amount,expVO.description], {"datasource":this.dsn} ); //get auto generated id queryExecute( "select max(id) maxId from expense", [], {"datasource":this.dsn, "name":"rs"} ); expVO.id = rs.maxId[1]; } function getExpenses() { queryExecute("select * from expense order by expense_date desc", [], {"datasource":this.dsn, "name":"rs"}); var result = []; if (rs.length == 0) return result; for (i = 1; i <= rs.length; i++) { var expVO = new ExpenseVO(); expVO.id = rs.id[i]; expVO.expenseDate = rs.expense_date[i]; expVO.amount = rs.amount[i]; expVO.description = rs.desc[i]; result.append(expVO); } return result; } function deleteAllExpenses() { queryExecute("delete from expense",[],{"datasource":this.dsn}); } } |
CFC is written completely in CFScript syntax. Note that this CFC is marked as client side CFC with attribute client=”true”.
In the constructor of this CFC (init method), we create database table, if it is not already created. Notice new query function, queryExecute, in the createTable function on line#27. This function takes sql statement as the first argument, array of parameter values as the second argument and then key-value pairs of attributes, that you would use in cfquery tag, as the third argument. getExpenses function returns array of ExpenseVO objects. This is how ExpneseVO CFC looks -
1 2 3 4 5 6 7 8 9 10 11 12 13 14 |
component client="true" { this.id; this.expenseDate; this.amount; this.description; function init(expDate, amt, desc) { this.expenseDate = expDate; this.amount = amt; this.description = desc; } } |
Now let’s look at the custom tag expenseList.cfm, remember this custom tag is used in index.cfm to display list of expenses -
1 2 3 4 5 6 7 8 9 10 11 12 13 14 15 16 17 18 19 20 21 22 23 24 25 26 27 28 29 30 31 32 33 34 35 36 37 38 39 40 41 42 43 44 45 46 47 48 49 50 51 52 53 54 55 56 57 58 59 60 61 62 63 64 65 66 67 68 69 70 71 72 73 74 75 76 77 78 79 80 81 82 83 84 85 86 87 88 89 90 91 92 93 94 95 96 97 98 99 100 101 102 103 104 105 106 107 108 109 110 111 112 113 114 115 116 117 118 119 120 121 122 123 124 125 126 127 |
<cfclient> <!--- Handle only tag start ---> <cfif thisTag.executionMode eq "start"> <cfset processTagStart()> </cfif> <cffunction name="processTagStart" > <cfset variables.action = ""> <cfif not structKeyExists(attributes,"parentDiv") or attributes.parentDiv eq ""> <cfreturn > </cfif> <cfif structKeyExists(attributes,"action")> <cfset variables.action = attributes.action> </cfif> <cfif structKeyExists(attributes,"expenses")> <!--- Displays list of expenses in a given div element If attribute.expenses is an array then create HTML table and display in the parent DIV If attribute.expenses is not an array then assume it to be ExpenseVO and append to the existing table ---> <cfif variables.action eq "displayAll" and isArray(attributes.expenses)> <cfset displayExpensesArray()> <cfreturn > <cfelseif variables.action eq "append" > <cfset appendExpense()> <cfreturn > </cfif> </cfif> <cfif variables.action eq "removeAll"> <cfset removeAllExpenses()> </cfif> </cffunction> <!--- Display array of expenseVO objects ---> <cffunction name="displayExpensesArray" > <cfset var expenses = attributes.expenses> <cfset var parentDiv = attributes.parentDiv> <cfif expenses.length eq 0> <!--- No expneses added to database yet ---> <cfset $("##" + parentDiv).append("<b>No expenses found</b>")> <cfreturn > </cfif> <!--- Create table ---> <cfset $("##" + parentDiv).children().remove()> <cfset tblEml = $(createHTMLtable()).appendTo("##" + parentDiv)> <!--- Add table rows ---> <cfloop array="#expenses#" index="expense"> <cfset $(tblEml).append(createTableRow(expense))> </cfloop> </cffunction> <!--- Append one expense item to the existing list ---> <cffunction name="appendExpense" > <cfset var expenseVO = attributes.expenses> <cfset var parentDiv = attributes.parentDiv> <!---First check if we need to create the table ---> <cfset tblElm = $("##" + parentDiv + " table")> <cfif tblElm.length eq 0> <!--- Table does not exist. Create one ---> <cfset $("##" + parentDiv).children().remove()> <cfset tblElm = $(createHTMLtable()).appendTo("##" + parentDiv)> </cfif> <!--- append expenseVO ---> <cfset $(tblElm).append(createTableRow(expenseVO))> </cffunction> <!--- Create HTML text for displaying expnese in a table row ---> <cffunction name="createTableRow" > <cfargument name="expenseVO" > <cfoutput > <cfsavecontent variable="tmpStr" > <tr> <td>#dateToStr(expenseVO.expenseDate)#</td> <td>#expenseVO.amount#</td> <td>#expenseVO.description#</td> </tr> </cfsavecontent> </cfoutput> <cfreturn tmpStr> </cffunction> <!--- removes all expense rows from the table ---> <cffunction name="removeAllExpenses" > <cfset var parentDiv = attributes.parentDiv> <cfset $("##" + parentDiv).children().remove()> <cfset $("##" + parentDiv).append("<b>No expenses found</b>")> </cffunction> <!--- Creates HTML table to display expenses ---> <cffunction name="createHTMLtable" > <cfsavecontent variable="tmpStr"> <table width="100%"> <tr> <th>Date</th> <th>Amount</th> <th>Description</th> </tr> </table> </cfsavecontent> <cfreturn tmpStr> </cffunction> <!--- Converts date in milliseconds to local string ---> <cffunction name="dateToStr" > <cfargument name="dateAsNumber" type="numeric" required="true" > <cfset tmpDate = new Date(dateAsNumber)> <cfreturn dateFormat(tmpDate,"mm/dd/yyyy")> </cffunction> </cfclient> |
This custom tag takes three attributes – 1. parentDiv : is the id of div element in which you want to display list of expenses. 2. action : valid values are displayAll, append and removeAll. displayAll action removed all expenses in the div before adding new expenses. append just adds to existing list. 3. expenses : is an array of ExpneseVO objects to display in the list. Notice use of cfsaveconent tag on line# 86 and 107. This tag makes creating HTML content with dynamic values very easy, otherwise you would create the content by appending strings. Another advantage of using cfsavecontent is that you get code assist for all the tags within cfsaveconent in the ColdFusion Builder.
Lastly, here is our app specific JS file app.js. It really does not have much content-
1 2 3 4 5 |
$(document).ready(function(){ $(document).on("click","#addBtn", displayAddExpenseDlg); $(document).on("click","#saveBtn", saveExpense); $(document).on("click", "#deleteAllBtn", deleteAll); }); |
Note that handler functions displayAddExpenseDlg, saveExpense and deleteAll are declared in index.cfm in cfclient block.
You can download the entire project . You can also download the Android APK file, install it and see how it works.
-Ram Kulkarni